Anamorphic Shooting – Is There an Ideal Sensor Size?

In this guest post, Vancouver-based freelance filmmaker and an anamorphic lens freak Tito Ferradans is sharing his thoughts about anamorphic shooting and the ideal sensor size with us.  The BMPCC 6K pushed anamorphic modes into Blackmagic’s cheaper models – such modes were previously reserved for the URSA lineup. Anticipating an increase in questions on this subject, I wrote this post. There are lots of misconceptions about sensor size and anamorphic shooting. I believe this started with the Panasonic GH4, but let me first explain the issue. Every other day I get messages from people “informing” me they can’t use 2x lenses because their camera does not have an anamorphic mode. They say they’re limited to 1.33x or 1.5x lenses and they don’t know what to choose. Some are even more hardcore and ask for camera recommendations. The Sony a7S II does not have an anamorphic mode, yet, I’ve been shooting anamorphic on it for three years now and it never gave me trouble. I recently got a Panasonic GH5 which features an anamorphic mode.

What is Anamorphic Mode, and why is it Good to Have it?

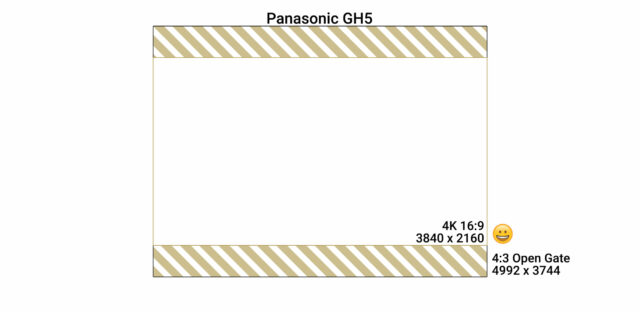
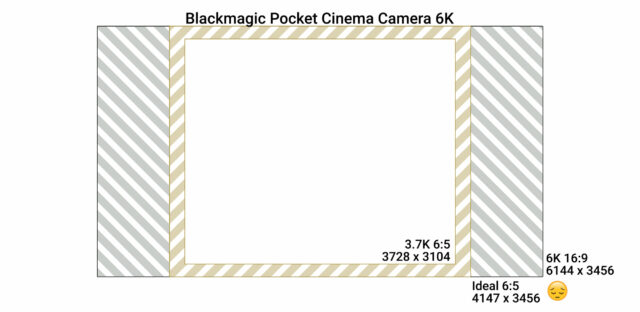
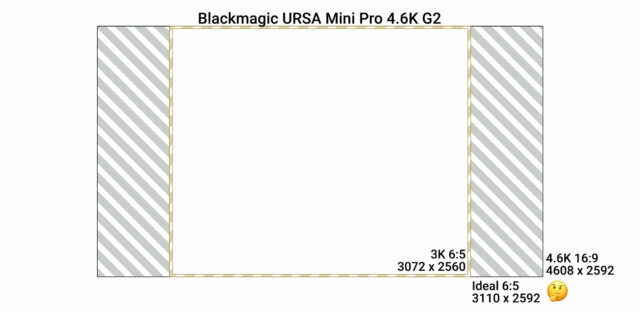
Anamorphic lenses squeeze more field of view onto the sensor. There’s a lot more to them, but this is the aspect we’re dealing with now. Let’s say the ideal anamorphic lens has a 2x squeeze, which means that you have to double the width of your footage in post production for your shot to look correct. Simple math time: shooting 16:9 (and then doubling the width of the frame) yields a bit of an extreme aspect ratio: 3.56:1, so far reserved for lens tests and Taylor Swift music videos. Cameras with anamorphic modes allow you to record different areas of the sensor, not necessarily 16:9. The GH4 allows 4:3 aspect ratio, the BMPCC 6K offers 6:5. Using a 2x scope, 4:3 becomes 2.66:1 and 6:5 becomes 2.4:1, classic CinemaScope. These modes are not using the full width of the sensor though. Basically, the camera is cropping out the sides of the footage for you. Is that what anamorphic mode represents? The exception here is the GH5 and its Open Gate mode. Since Panasonic’s GH series has a 4:3 sensor, their techs figured “why not let people record the entire sensor area?”. This leads us to the actual advantages of anamorphic modes.

What are the Advantages of Anamorphic Mode?

The minor advantages of an anamorphic mode are that it makes more efficient use of the available sensor area and thereby requires substantially less or no crop in post-production. It also allows for better use of the camera’s bitrate over the final image area. The biggest advantage of a proper anamorphic mode though is that it uses a larger sensor height compared to 16:9 video. If you look at the numbers and schematics below, the difference is easy to see on the GH5 and other cameras that record Open Gate. This gives you a frame that is not only wider after stretching, but also taller! But if you look at the BMPCC 6K, Ursa Mini 4.6K and others, things are a little different… Not only you are missing additional height offered in 16:9 modes, you are also locking yourself out of the valuable possibility of reframing in post-production.

So There are the Advantages of not Having/Using it?

If your camera has an anamorphic mode but it doesn’t add any height to the output compared to your other recording modes you are basically discarding information that could be useful later. That is why I never complained of shooting 2x anamorphic with the Sony a7S II. I set it up with 4:3 crop marks and record 16:9 all the way. The only thing that really matters is that I get clean footage in the marked 4:3 area. Anything usable beyond those marks is a bonus and it allows me to reframe in the editing process to balance out compositions or even create camera moves that didn’t exist before.

Sony a7S II + Atlas Orion 40mm T2 2x Anamorphic Lens. See how the 2.4:1 area is clear?

Bottom line: Always aim for the mode that gives you the most vertical resolution and better use of the sensor, even if you have to crop some of the frame later. You’ll have more data, more sensor area and more image to work with. If you’re on a tight deadline, sure, skip the crop and do it all in camera. Regardless, if you are lost or new on how to deal with those post-production aspects, I have videos up on how to set proper aspect ratios in all major editing software and how to crop footage easily too! Now, it looks as if to maximize your scope’s capabilities you will need to get the Panasonic GH5. 

An Afterthought in “Anamorfaking”

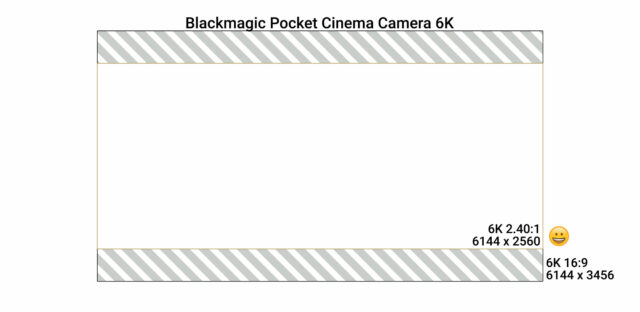
If you don’t have anamorphic lenses and you still want to craft the anamorphic look, the BMPCC 6K also offers a 2.40:1 recording mode that will give you a frame that is perfect CinemaScope although shot with spherical lenses. No need to hassle with cropping later. You can combine this aspect ratio with modified lenses and filters to create a look that would otherwise cost a fortune! More on anamorfaking soon in an upcoming post here on cinema5D. If you don’t have a brand new BMPCC 6K, most other cameras offer some type of crop marks or overlays that allow you to frame for 2.40:1 or 2.35:1 while still shooting 16:9. Framing with crop marks will give you an accurate idea of your final framing and save you from unexpected cropping issues such as too much headroom or chopped heads! Is filming with anamorphic lenses or adapters interesting for you? Would you like to craft your anamorphic filming skills by reading more related content on our site? Let us know in the comment section below. 

Z CAM E2 Cameras Firmware Update with ZRAW Capabilities

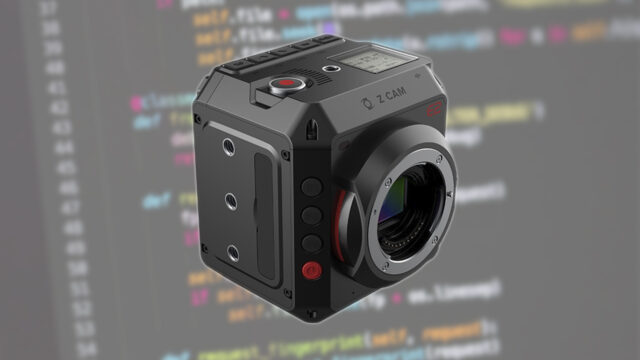
Good news for Z CAM E2 camera owners: the team at Z CAM released a new firmware update that unleashes ZRAW capabilities for various E2 camera models. Let’s take a closer look at it! ZCAME2_ZRAW_Featured

Z CAM E2 – Firmware 0.88 Includes ZRAW

The team at Z CAM launched a new firmware (version 0.88) for their E2 and E2c cameras. This firmware – and future firmware versions – should also be compatible with the upcoming E2 S6/F6/F8 cameras that are expected to launch later this year. Here is the complete list of the new features of this 0.88 firmware version:
  • Addition of ZRAW (partial-debayer), supports up to 4096×2160@30fps initially. 4K 60fps will be supported later.
  • No proxy recording is allowed when ZRAW is selected. You have to use an iOS device or the HDMI output to record proxy files.
  • Monitor preview LUT, x33 cube format.
  • Pre-rolling.
  • Possibility to capture still images (JPEG only).
  • VFR fine control, one frame per step.
  • Native ISO toggle control.
  • Parade view.
They also improved and corrected some bugs:
  • Card formatting compatibility.
  • AWB always use a white priority in Z-Log2.
  • Performance optimization.
  • Bugs fixed: Time Code sync to an external device and other minor bug fixes.
It’s always nice to see a manufacturer bringing new functionalities and long-awaited features to a product. Otherwise, there would be very little information about this new RAW format. You can download this new firmware directly on Z CAM’s website.

ZRAW VideoSuite

At the moment, one of the only things we know is that any NLE does not support this new Z CAM RAW format. To play and convert ZRAW footage, you have to use Z CAM’s new ZRAW VideoSuite software. This software is available on Windows 10 only. Hopefully, a Mac version will come out soon. ZRAW VideoSuite allows you to output your files in either DNxHR, H.265 or uncompressed YUV in 4:2:2 or 4:4:4 color sampling (H.265 is 4:2:2 only). Also, various DeNoise levels are available, as well as some essential color grading tools. To me, having to use another piece of software – only Windows compatible – is a bummer. It reminds me of the early days of the Canon C200’s Cinema Raw Light. Usually, these “conversion” software are poorly optimized, and they take a lot of time to render your footage. It’s just another step in the post-production workflow that slows you down in the creative process. I hope that ZRAW will be supported by other NLEs soon. What do you think of this new firmware version and the addition of ZRAW? Let us know in the comments below!

Cartoni RED LOCK Tripod Announced – Lightweight Camera Support

The Italian tripod manufacturer Cartoni has just announced four new products ahead of IBC 2019: two tripods and two tripod heads. Among these products, there is an exciting set of lightweight tripod legs: RED LOCK. This tripod for camera operators on the go weights only 6.5 lbs/ 3 kg but can support up to 132 lbs / 60 kg. Let’s take a closer look at these new products. Oh, and if you haven’t done so, please take a moment to watch our video which we visited the Cartoni family tripod factory facility and saw how their tripods are made. CartoniRedLock_Featured

Cartoni RED LOCK Tripod Legs

The latest addition in the Cartoni line of tripods is a lightweight set of sticks called the RED LOCK. With a weight of only 6.5 lbs / 3 kg, this aluminum tripod looks perfect for indie filmmakers and one-man-band shooters. But don’t let this two-stage tripod fool you, as it can support an incredible amount of weight, up to 132 lbs / 60 kg. CartoniRedLock_01 In terms of height, it measures 77 cm when fully folded. By pulling the two red levers, you can extend it to a maximum height of 153 cm / 60 inches. If you need to go low to the ground, you can quickly spread the legs thanks to the Smart Spreader and go as low as 50 cm / 19 inches. At the bottom of the tripod legs, there are integrated spike feet for shooting on uneven terrains. Also, the tripod comes with newly design rubber feet. There are no words on pricing from Cartoni except that it should be “surprisingly affordable” and will ship by the end of this year. CartoniRedLock_02

Cartoni MAXIMA 5.0

Amongst the new products, there is also a new 5.0 version of the famous MAXIMA tripod head. These MAXIMA Flat Mitchell / 150mm bowl base tripod heads are mostly used on feature films and high-end projects. The MAXIMA 5.0 features Cartoni’s patented counterbalance and can support a payload from 0 kg up to 50 kg. CartoniRedLock_03 The great thing with MAXIMA tripod heads compared to O’Connor ones, for example, is that all the controls are on the operator side (and the locks/knobs are silent). The rather long and sizeable sliding camera plate on top of the tripod head is compatible with ARRI, Sony, and O’Connor ones. The head comes with a telescopic pan bar and a short front pan bar. No words on pricing from Cartoni yet, but these MAXIMA tripod heads are usually aimed at rental houses as they are in the $10.000 range. The MAXIMA 5.0 will be available at the end of the year. CartoniRedLock_04

Cartoni Master 25 and S200

A much more affordable tripod head has also been announced, the Cartoni Master 25. This lightweight tripod head has a payload capacity of up to 30 kg / 66 lbs. It will be available in black & gold design and grey anodized aluminum. Finally, there is a new set of sticks aimed at sport and event shooters, the Cartoni Sport 200 tripod legs. It is made of aluminum, and the legs are angular, which should provide better sturdiness compared to standard tubes. The S200 weighs 10.5 kg / 23 lbs and can support every camera packages on the market with a payload capacity of up to 200 kg / 441 lbs. It accepts classic Mitchell flat base tripod heads. No words on pricing on any of these products, but they should ship by the end of the year. We will make sure to take a closer look at all of Cartoni’s new products during IBC 2019. What do you think of this new RED LOCK tripod legs? Have you ever used a Cartoni MAXIMA tripod head? Let us know in the comments down below!

Z CAM E2 Cinema Camera in the Wild – Hands-on Review

While planning a trip to the Indian jungle to film a short documentary about Pench National Park, my colleagues at cinema5d challenged me to leave my standard gear at home and take the new cinema camera Z CAM E2 instead – would it be up to the task? Edit: just after completing this review, Z CAM introduced a new firmware update (V 0.88) featuring ZRAW (internal RAW capture, partial debayer, supports up to 4096×2160@30fps initially). We might take a closer look at this ZRAW firmware in the near future.
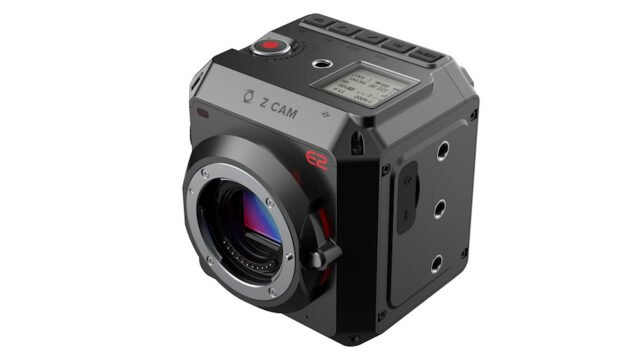
Z CAM E2 camera

For a while now I have been following the development of micro four thirds cameras. To be specific, I bought my first one exactly 10 years ago, the Panasonic LUMIX GH1. Back then it was hampered by a weak codec (Full HD, AVCHD in 17Mbps) and the max. usable ISO value was 400, but the Voigtlaender lenses gave it the full frame look (e.g. the 25mm f0.95), and the hack of V. Kiselev at a later stage improved the bitrate to a stable 25Mbps. All in all, I loved the images – so much that I never sold it… Fast forward 10 years and I have the new cinema camera Z CAM E2 from the Chinese manufacturer Z CAM in my hands. A micro four thirds camera capable of shooting 4k DCI using a LOG profile (Z-LOG2) recording ProRes HQ 10bit 4:2:2 internally up to 60fps (4k H265 up to 120fps, 160fps in 1:2.4 mode). Wow!
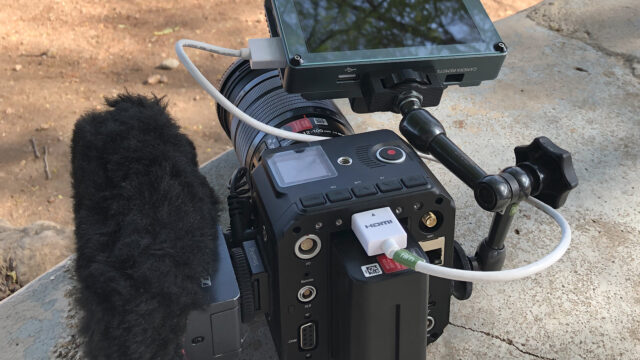
Z CAM E2 – Minimum Rigging

Setting up the Z CAM E2 Cinema Camera for the Trip

What I always liked about the micro four thirds format is the possibility to adapt almost any lens, including the option to use a speed booster (0.71x). The speed booster allows the use of Canon EF glass for example, while at the same time increasing the light sensitivity by one stop. In 4k DCI mode (4096 x 2160) the crop factor of the Z CAM is about 1.9, using the speed booster gives a crop of 1.35 approximately. Unfortunately, we had no cage available for the Z CAM, but the camera has various ¼” mounting points on top, bottom and on the sides. In conjunction with the Z CAM E2 I used an early prototype of the Portkeys BM5 monitor mounted with a magic arm, see the image below (the released version is black, the prototype had an anodized green surface finish). For sound, I took a Sennheiser MKE 440 with me, using the 3.5mm audio input on the Z CAM E2 – mounted to the side, which was not ideal. Also, the recorded sound quality via the 3.5mm input leaves a lot to be desired. I hope Z CAM can improve on the audio part in the future. Lenswise, I opted for two lenses only: the Olympus 12-100mm f4 for the documentary part (it has great image stabilization), and a Canon EF 100-400mm f4.5 – 5.6 version 1 using a Metabones speed booster for the wildlife part. Note that with the 4k DCI settings and 1.9 crop factor vignetting can occur at the widest setting of the Olympus lens. The clever location of the Z CAM E2 battery allows the use of standard Sony NPF batteries with various capacities (and protects the HDMI port at the same time). For my trip I took a few 5200mA (NP F750) ones with me – good news is that power consumption was surprisingly low hence battery life was no issue at all. The same type of battery can be used for the Portkeys BM5 monitor as well which is a big plus, and I needed all the spare batteries for the monitor, as its power consumption was quite high.
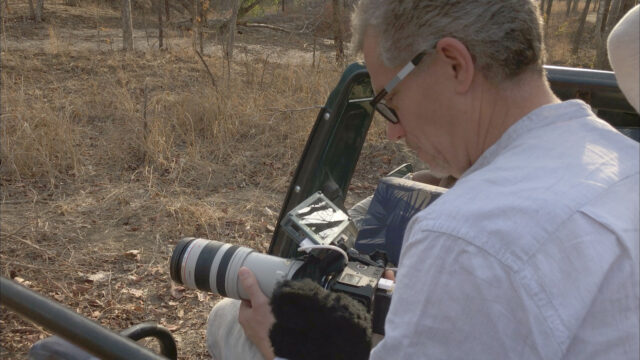
Man at work- With the Z CAM E2

Build Quality and the Safari Trip

Temperatures in the Indian jungle would be as high as 45°C, the climate is very dry hence exposing the gear to the bumpy, dusty roads in an open jeep got me a bit nervous. Would the cam and the monitor survive? The answer is yes. I had no issues at all – the build quality of both monitor and camera is top notch, and there was no overheating of both devices. The monitor has a fan which I turned down to the lowest setting to avoid picking up the sound, so it got very very hot. It still worked reliably.

Image Quality of the Z CAM E2 Cinema Camera

Now, this was a major deciding factor for me to take the Z CAM E2 cinema camera on my trip – 4k DCI ProRes HQ in a small but durable package – despite the risk of taking a new, unknown camera with me I just couldn’t say no. And the Z CAM E2 did not disappoint – see the video on top. The camera has a very organic, detailed image with fantastic, out of the box colors. Grading the Z-LOG2 profile using the LUT’s supplied by Z CAM on their homepage was a joy and is as easy as it can get. On the night shots, I had to ramp up the ISO to 16000 – I think the results are still OK and usable.

Dynamic Range

Z CAM claims 13stops of dynamic range on their marketing materials, so I was quite curious how it would fare in our standard test (click here for more info on how we test). Firmware tested was 0.86, raw was not available at that time.
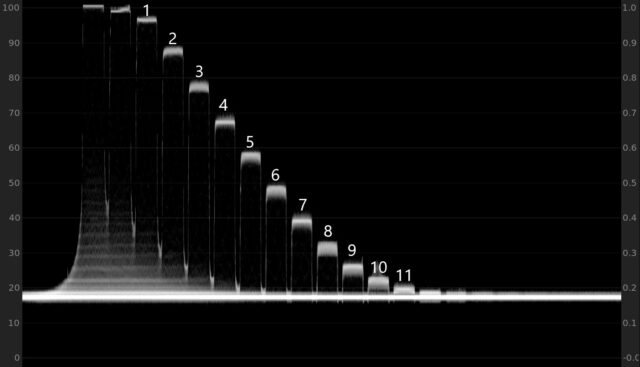
Fig.1: Waveform plot of the Z CAM E2 cinema camera at ISO500 using Z-LOG2 ProRes HQ – about 11 stops can be identified above the noise floor.

The waveform plot of our Xyla 21 stepchart shows about 11 stops (see figure 1). Using IMATEST to calculate the dynamic range I got a result of 10.8 stops at ISO 500, Z-LOG2 using ProRes HQ 4k DCI 23.98fps (at a signal to noise ratio of 2, 11.9 stops for SNR = 1, see figure 2). The Z CAM E2 uses a dual ISO sensor, so I also tested the second gain value of ISO 2500 and got a result of 10.4 stops (SNR = 2). These are very good results for a micro four thirds sensor, almost exactly the same as for the Panasonic GH5s (10.7 stops) and coming in second behind the other four thirds cinema camera rival, the Blackmagic Pocket Cinema Camera 4k, BMPCC4k, which has 11.6 stops of dynamic range in ProRes HQ. The Z CAM E2 also offers an HDR mode, where it captures a second image with an 8 times higher shutter speed for the highlighted part and merges it into one video frame (to increase the dynamic range by additional 3 stops). I have tried this option in practice but quickly abandoned it for moving shots, as the motion blur (or partial lack thereof) of the resulting image looks weird. It may work for a static interview though, or a situation where the scene demands a higher shutter speed (1/200 and up).
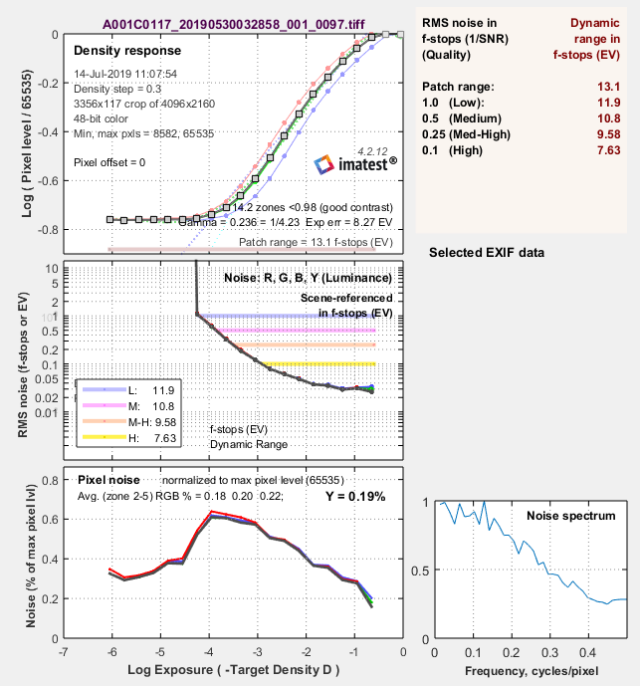
Fig. 2:IMATEST calculates 10.8 stops of dynamic range for the Z CAM E2 cinema camera at a signal to noise ratio of 2 for 4k DCI ISO500 ProRes recording using Z-LOG2 (1/SNR = 0.5, medium value in the upper right hand table).

Z CAM Rolling Shutter

We are using a new test method based on a high frequency, quartz & microcontroller based strobe light at 300Hz. As the sensor readout happens from the top to the bottom, we are getting a sequence of black and white bars from the strobe. A quite surprising result on the rolling shutter measurements, which adds up to the very positive overall impression: in 4K DCI 25p mode (using ProRes HQ and ZLOG2) I got a very good result of 11.1[ms]. For comparison, the BMPCC4k has a rolling shutter of 16[ms] in UHD 25p mode.
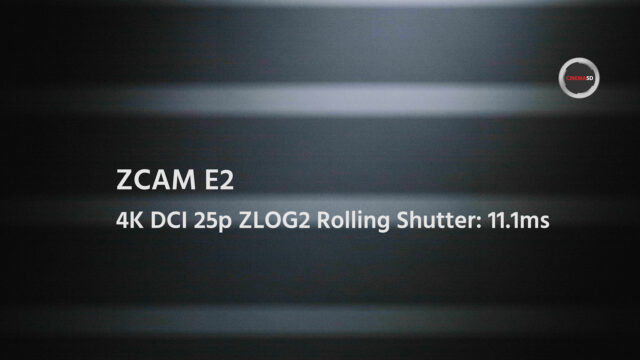
Z CAM Rolling Shutter effect


The Z CAM Universe – the Facebook Group, the app, and the Camera’s Menu

First and foremost the Z CAM facebook group is worth mentioning, the spirit of conversation is very good and people from Z CAM as well as visitors are helpful, including the CEO Kinson Loo who answers questions very often himself. There is also a nice Z CAM smartphone app available for IOS (Android still in a beta release), which connects to the camera’s wifi and allows access / display / change all settings as well as providing a full screen image preview with little latency. In essence, you could use your smartphone instead of a monitor if you accept some lag between the recorded and image view. For the camera part, all the exposure tools (zebra, false color), as well as focus peaking, work very well, although the focus peaking is very strong – I would prefer an option to adjust this in the menu (not available currently). The menu itself is straightforward and well structured, also custom presents for the function buttons are available. However, some of the settings require deeper dives (changing the frame rate for example), hence doing that in the heat of the action does not work so well. One thing to be aware of is the fact, that for ProRes no in-camera playback option is available (firmware version 0.86 at the time of shooting). I hope this changes with a future firmware.

The Z CAM E2 in Conjunction with the Portkeys BM5 Monitor

In theory, this combo should work very well. The Portkeys BM5 monitor (for detailed specs see our article here) is a 5” FHD monitor which allows via a separate cable to display and change settings in the camera’s menu on the touchscreen – on our early prototype this didn’t work though and a newer firmware wasn’t yet available. The screen itself is very bright (2000 NITS), even in direct sunlight I had no issues seeing the image. Unfortunately, the surface of the screen is very reflective which can hamper the viewing experience, see figure 3 below. Also, it gets very very hot and is quite power hungry. I used the “low” setting for the internal fan to avoid picking up the sound on video. All in all, it is a good monitor, but I didn’t like one detail: it only takes 1080p signals via HDMI, although the Z CAM E2 could provide a 4k signal. Hence, you have no good way to judge focus on the monitor itself for a 4k HDMI signal, as neither punching in (1:1 pixel view) nor the in – built focus peaking of the monitor would display this signal accurately. So, you have to rely on the camera’s focus peaking (displayed via HDMI to the monitor).
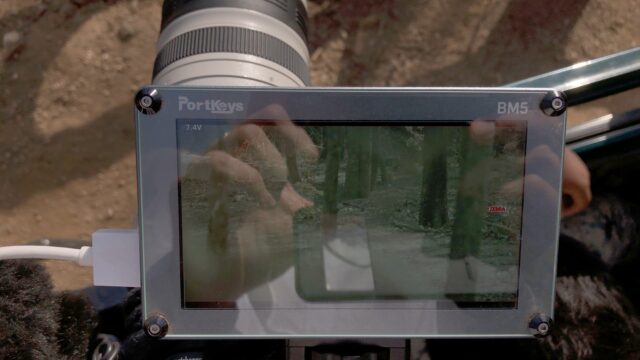
Fig. 3: The Portkeys BM5 monitor – bright (2000 NITS) and well built, however the screen is very reflective which can hamper the viewing experience outside.

Conclusion

The Z CAM E2 cinema camera is a great new addition to the line of micro four thirds cameras, and got so many things right in the first place – first and foremost the image (audio via the 3.5mm input leaves a lot to be desired though). I love the fact that it allows high frame rates, ProRes recording, and many more things. Z CAM is definitely a company to watch out for – also, I am curious to see their new APS-C and full frame cameras (S6, F6, and F8) that are scheduled to arrive later this year. However, comparing the E2 to other cinema cameras in this sensor class the competitor BMPCC4k cannot be neglected. The BMPCC4k is significantly less expensive, has a large build in screen (5”) and allows internal ProRes as well as 12bit RAW recording (Blackmagic raw). Also, Blackmagic managed to squeeze out 0.8 stops more dynamic range. Hence, as always you have to choose the camera wisely that you need for your particular application, and given the other features of the Z CAM (multi-cam recording & syncing, wifi, etc…) it may be the perfect choice for you!    

Real-Time In-Camera VFX Could Be the Green Screen Future

During the Unreal Engine User Group at SIGGRAPH 2019, the team at Unreal Engine showed an impressive real-time in-camera VFX technology that could change how films are made. While this term is often overused, this technology could be a game-changer and kill the green/blue screen in the near future. Let’s take a closer look.

Unreal Engine

Unreal Engine is a game engine developed by Epic Games which is out since 1998. Indeed, you can use it to build video games like Fortnite. But, you can also use Unreal Engine’s real-time technology for architecture purposes, VR and AR, and even cinematography. The Unreal Engine is an eco-system of tools and applications. The entire source code is available for free, so everyone can modify it and expend the various engine features. If you are not a “code guy,” don’t worry. It’s easy and intuitive to try and create whatever you want in the Unreal Engine without having to write a single line of code. The kind of photorealistic graphics or videos you can pull out of the Unreal Engine are stunning.
UnrealEngineInCameraVFX_Featured

Image credit: Unreal Engine.

Real-Time In-Camera VFX

The team at Unreal Engine has revealed an exciting collaborative project with Lux Machina, Magnopus, Profile Studios, Quixel, ARRI, and Matt Workman. I like to see people like Matt Workman involved in this kind of project. To make it short, Matt is a cinematographer and founder of Cinematography Database. Also, he is the creator of Cine Designer, which is one of the most potent pre-production and lighting tool for DPs available on the market.
UnrealEngineInCameraVFX_01

Matt Workman during the Unreal Engine User Group at SIGGRAPH 2019. Image credit: Unreal Engine.

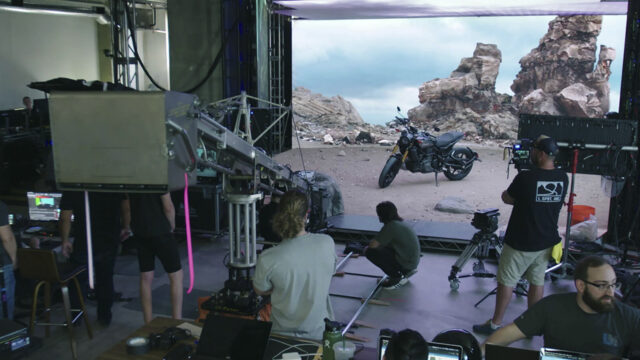
During their Unreal Engine User Group event at SIGGRAPH 2019, the whole team experimented around real-time in-camera VFX. Here is the setup:
  1. A studio with four giant LED panels (three walls and a ceiling) to act as a background.
  2. All four LED panels are powered by nDisplay to render the Unreal Engine Project simultaneously on all four displays.
  3. Various engine-controlled ARRI SkyPanels all over the studio. That way, the team can match in real-time the lighting of the “real subject” and the lighting of the background.
  4. A couple of sensors on the camera that are linked to the Unreal Engine. That way, the Unreal Engine 3D background moves accordingly to the camera position (and focal length) in the space.
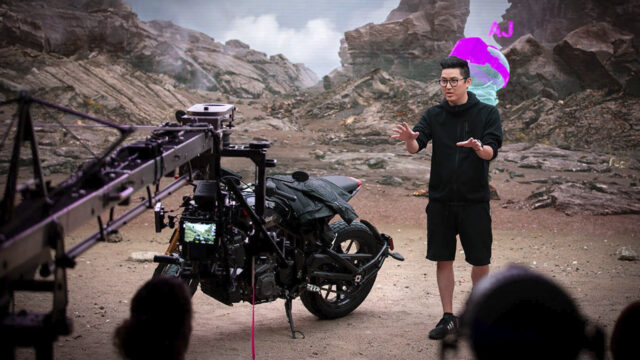
The results in the video at the beginning of this article are impressive. The actor and the props are perfectly blended into the environment/background. All of that happens in real-time in-camera without the need for green screens.
UnrealEngineInCameraVFX_02

Image credit: Unreal Engine.

The End of Green Screen Shooting?

The beauty of this system is that everything in the background is CG. If you don’t like something in the scene, or something is not in the right place for a specific camera angle, move it out of the way. In Unreal Engine’s example, you can see how easily they pick a rock and displace it in real-time. However, you could also do it in post-production if you shoot your film on green/blue screen, right? It’s true, but it means you would have to modify your 3D scene and render it again.
UnrealEngineInCameraVFX_03

Image credit: Unreal Engine.

The main advantage of this technology is that everything is happening in real-time in-camera. It can save you a tremendous amount of time in post-production. However, the major drawback of this technology is that once the shooting is over, you can’t change your mind on what’s happening in the background. In this “prototype” stage, I think that this Unreal Engine technology could be helpful for commercials or short lengths projects. Of course, it’s not ready for multi-million dollars feature films, yet. But the VFX future looks exciting for sure. What do you think of this Unreal Engine real-time in-camera VFX technology? Do you think it could replace green/blue screen shooting in the next years? Let us know in the comments down below!  

BMPCC 6K vs. BMPCC 4K – Which one is for you?

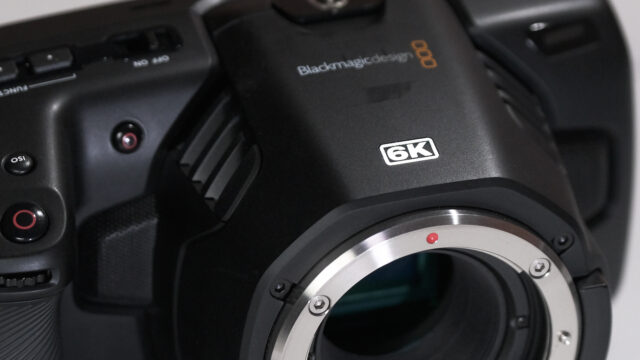
The new Blackmagic Pocket Cinema Camera 6K has landed. It offers (up to) 6K resolution, a Super 35 sensor, and a Canon EF mount. Aside from those changes, what are the main differences (or similarities) between this one and the older Pocket Cinema 4K? In case you are already a proud owner of the 4K version, will it make sense to upgrade? In the above video and in this article I’ve tried to answer this question. 

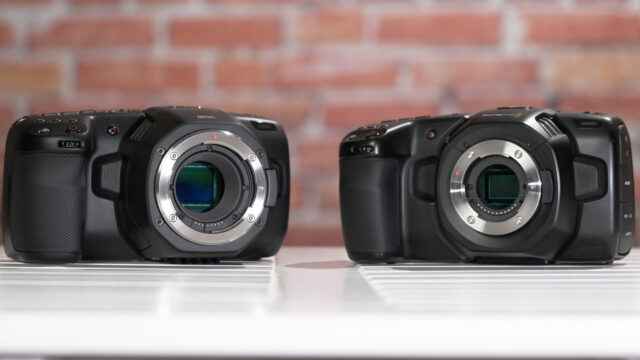
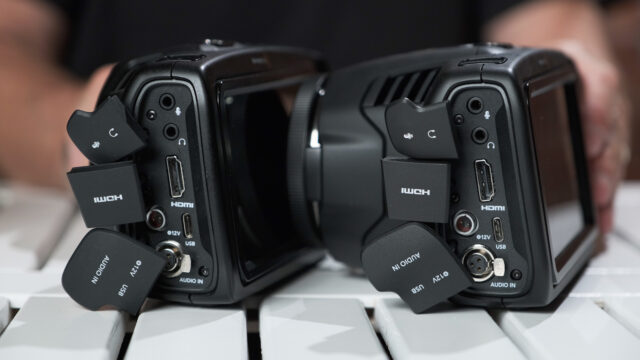
BMPCC 6K (Left) VS BMPCC 4K (Right)

Blackmagic Design, the company who engraved on its flag to cater us, the filmmakers, with high quality “on the budget” tools for filming/editing and postproduction, has done it again by delivering a camera that obviously managed to stir our swamp. Personally, in all my cinema5D years, I haven’t seen such a phenomenon where people endorse a camera so fast. Probably Blackmagic Design did something right. Apparently, when it comes to “value for money”, people are more forgiving when some (important) features are missing. But for now, let’s leave usability aside as this is not the essence of this article.

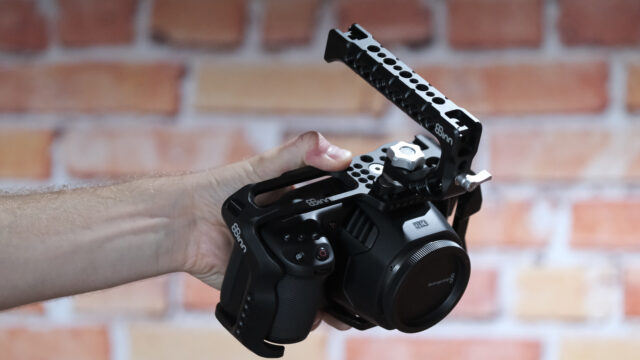
8Sinn cage. Perfect fit

Stay Tune – Three Parts Continues Coverage

As this camera proved to be of great interest for many, we’ve decided to dedicate the extra time to review it inside out. Here in part one, I’m talking about how the new camera compares to the older BMPCC 4K. The second part, which I took the new BMPCC 6K for a short spin and shot a short documentary with it, will see the day of light early next week.  The third part is a bit more technical. Gunther, my colleague, will conduct aDynamic Range, Latitude and Rolling shutter tests during next week. Of course, we will share our results with you guys as soon as we have them ready.

EF Mount VS Micro Forth Third Mount

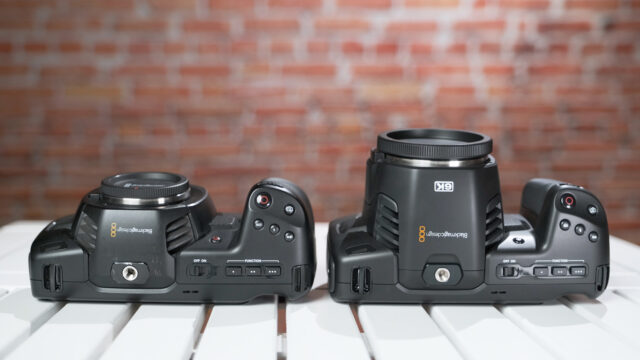
BMPCC 6K vs. BMPCC 4K – The Differences

6K Resolution: Let me start from the obvious… Unlike its 4K brother (or is it sister?), the new 6K camera can be used for filming in up to 6K resolution in different frame rates. The nice thing is, that even when filming in the highest resolution and codec, a fast SD card can still be used for convenient internal recording. (BM RAW 3:1, 6144 x 3456. We heartily recommend using Angelbird V90 cards. They are fast and reliable). Mind you that this will work when filming in 24/25p. If your wish is to film in 50/60p, CFast 2.0 cards will become your best friend. Both cards options are rather limited when it comes to capacity, so a feasible solution will be to use an external SSD. Again, I can recommend using Angelbird as I’m yet to be disappointed with their media quality or, customer service. (Wish the same could have been said about Lexar. What a horrible customer service experience. NEVER again!). By the way, speaking of resolution, mind you that recording in 6K is available in Blackmagic RAW codec only. (4K can be recorded in ProRes). I guess Blackmagic design wanting people to convert and use their DaVinci resolve platform for the purpose of editing. S35 sensor: Unlike its sister (or is it brother?), the sensor inside this camera is larger than the one found inside its 4K sibling. (Super 35 vs. Micro Four Third). In fact, it is a little bit smaller than other S35 sensors, especially those made by Canon, but who are we be too so picky… In general, the advantages of having a larger sensor are a wider field of view, easily manipulating depth of filed and, depending on the sensor pixel count (and pixels size), better lowlight capability. Active Canon EF Mount: BMPCC 4K has a Micro Four Third lens mount. The new BMPCC 6K is now equipped with an EF lens mount. It’s absolutely legit to ask if Blackmagic did the right choice here, but in all honesty, I do understand why they went this way. The good thing, it’s time to air brush some dusty EF mount lenses. I thought I’ll never use them again… The less good thing, any other modern mount could have taken this camera to a different level when it comes to lens usage flexibility (shorter flange, bigger chance for adaptivity). In a way, that’s where the older BMPCC 4K shines. The MFT mount is very adaptable. Throw a Metabones Speed Booster EF to MFT ULTRA  0.71X on it and bang, your field of view becomes wider (even more than the one found in the new camera), and on top, you gain one stop of light. As a result of using the EF mount on the new BMPCC 6K camera, NOT all cages suited to the 4K model will fit. We can confirm that 8Sin and SmallRig cages will. In regards to Tilta’s cage, “as is”, the cage WILL NOT fit. With a little adjustment that forces one to move the front nose part (“Tilta’s logo”) and the very small rubber band under it, it will fit, BUT it will also be VERY tight and can cause some scratches to the camera body itself. Photo capabilities:  Up to 21.2MP still image capture. This is an improvement over the 8MP the BMPCC 4K offered. Will test this feature when in the field. Price:  BMPCC 6K is $2,495 and the BMPCC 4K is $1,295. No doubt that both camera prices are fair, yet, it is a difference that should be mentioned.

Same Inputs and Outputs

BMPCC 6K vs. BMPCC 4K – The Similarities

Where to start. Both cameras share so much together. Excellent OS (The best in the industry to my taste), color science, 1920 x 1080 touchscreen 5″ LCD, buttons layout, general camera body structure (but the upper EF mount and lower ventilation ribs). Inputs/outputs, power options. Even the battery life is almost the same. The advantage goes to the new 6K camera as it was running about 6 minutes longer… (Yehhh). When it comes to autofocus performance, both cameras showed inconsistency, so each did a bit better on a different round (long story short, both behaved the same). Weight-wise, the BMCC 6K is 168g heavier. I guess I can live with this… When it comes to low light, I’ll try and take a closer look, but for now, it looks as if both are performing in a similar way. Dual native ISO values are the same, the cleanest image should be obtained when using ISO 400 and ISO 3200. Last but not least, even the rolling shutter effect seems to be visually similar. As I wrote before, we will test and come up with a number soon.

BMPCC 6K

Conclusion:

Both, the old BMPCC 4K and new BMPCC 6K are very efficient filming devices. At the end of the day, it really depends on your needs and budget. I guess if I was a BMPCC 4K owner, I wouldn’t rush to replace my camera, while if I was in the market for purchasing a new capable device, the BMPCC 6K would certainly be a candidate to capture the top of my list.